External Features
Warning
New features have been added. Previous user functions can no longer work. Please refer to the data access section to take into account the changes.
Note
External features now accept keyword arguments that can be provided in the configuration file.
What is the external features module ?
This module proposes to use user-provided code to compute additional features which will be used for training and prediction.
By default, and if possible depending on sensors, iota2 computes three spectral indices: NDVI, NDWI and Brightness. Additional radiometric features can also be provided using the additional_features field in the configuration file.
However, features more complex than simple radiometric indices may need the ability to write some code. This module allows to compute these kind of features.
The main idea is to extract the pixel values as a numpy array, so it is easy to compute everything you want.
Which data can be used with external features ?
iota2 can provides two time series:
the output of iota2 workflow, the gapfilled (or not) reflectances and spectral indices (NDVI, NDWI, Brightness for Sentinel2)
the raw time series, with no kind of interpolation
In the case of multiple tiles, the raw time series of each tiles contains different dates resulting in a raw feature vector of varying size across tiles. Such situation is not handled by almost of the machine learning algorithm that adopt a feature vector based representation (e.g., such as Random Forets, SVM and conventional neural network).
To this end, the fill_missing_dates option was included to provide for each the same set of dates (the set is the union of all dates for each tile) where the missing dates are encoded as missing value.
In addition to the raw time serie, the mask time serie is available to indicate which pixels are valid (mask values is 0), cloudy or edge or saturated (mask value is 1) and a new flag for non acquired dates (mask value is 2).
The list of dates can also be accessed in the user code, for instance with the function get_raw_dates.
An exogenous data can also be used. The term exogenous here refers to an image, covering the entire area of interest. If multiple tiles are used, it must be tiled prior to execution using the tool mentioned in exogeneous data documentation. This data can be used for external features computation. For instance, a temperature map or a LAI. This data can be a multiband or monoband image.
How to use it ?
To use external features, a single python file containing the functions definitions has to be provided as well as the two following blocks in the configuration file :
external_features
python_data_managing
The external_features section must contain the two following fields:
modulefull path of source code file with the “.py” extension
functions- a string listing functions to be computed, separated by spacesalternatively, keyword arguments can be provided along with function name (see examples below)
iota2 provides several external functions ready to use. The complete list of functions is available in external_code.
Some of them are documented, explaining how to manage data and the output requirements:
The workflow try to find functions first in the module user code source, then it looks in the source code.
If a function in functions is not found, the chain raise an exception and not start.
There are several optional parameters, initialized by default, the most relevant to manage data are:
chunk_size_modeThe split image mode. It can be
split_numberfor dividing the image according to the number given oruser_fixedfor working with the chunk size indicated by parametersnumber_of_chunksthe number of chunks used to split input data and avoid memory overflow. Mode
split_numberonlychunk_size_xandchunk_size_ygive a chunk size according to axis x and y
padding_size_xandpadding_size_ygive a chunk padding size according to axis x and y
Note
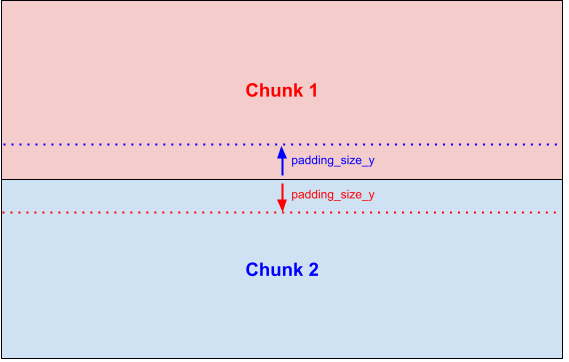
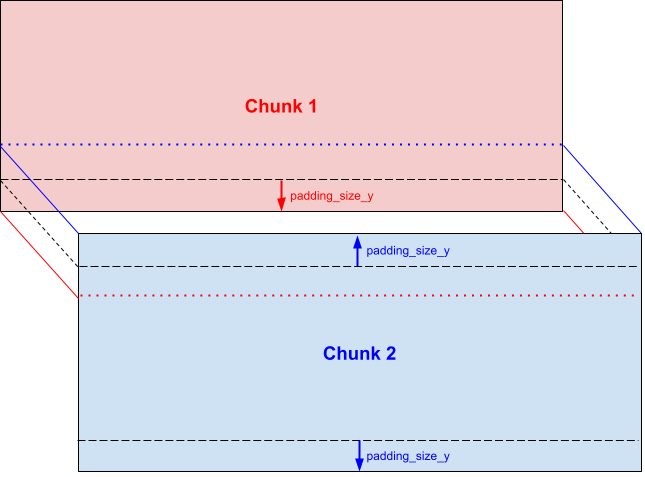
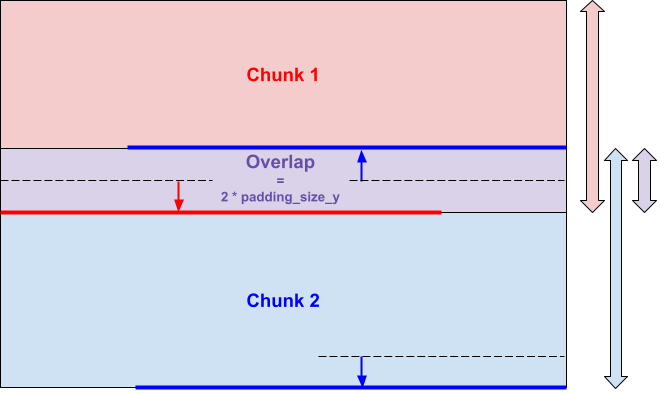
Padding is helpful for contextual approaches (e.g. CNN) where features of the neighboring pixels are needed. Here is an illustration for a vertical split with chunks on Y axis.
The classic image split doesn’t allow to deal with the pixels at the edges of a chunk, so a padding can be added to the chunk:

This padding is added to inner borders of each chunk:

Thereby neighboring chunks overlap each other:

No change are made to the borders of the image, the pixels of these borders must be treated individually.
The array of computed values returned by the external features function must be of the same size than the input array of pixel values. Values on paddings will be automatically removed downstream.
data_mode_accessThree values are allowed:
raw enable access to raw data and associated masks
gapfilled enable access to gapfilled data
both enable both access
The default value is gapfilled.
fill_missing_datesThis option works only with raw or both mode enabled. It allow iota2 to fill with 0 all dates not acquired. Then each tiles have the same dates. Each filled date has a corresponding mask with a dedicated value.
Warning
It has been noted that in some cases, once compression_predictor is set to 2, the features are written to disk, the raster file may be empty. If this is the case, please change the predictor to 1 or 3.
Once this field is correctly filled, iota2 can be run as usual.
Coding external features functions:
Before explaining how external features must be coded, some explainations about the available tools.
iota2 provides two classes used for external features:
external_numpy_featuresthe high level class, used in the iota2 processing. This class uses the configuration file parameters to apply the user provided functions. For a standard use, the class has no interest for the user.
data_containerthis class provides functions to access data. The available methods change according to the sensors used.
To have an exhaustive list of available functions, it is possible to instanciate the data_container class, using a sensors parameters dictionnary and a tile name.
All functions contained in data_container are named as : get_mode_sensors-name_Bx, where x is the name of bands available in each sensor, and mode is raw or interpolated.
For instance for Sentinel2 (Theia format) it is possible to get all pixels corresponding to the band 2 with get_interpolated_Sentinel2_B2() function. The returned numpy array is the complete time series for the corresponding spectral band.
It is also possible to use iota2 default spectral indices, like NDVI. In this case, the get function is named get_interpolated_Sentinel2_NDVI.
Note
There is no multiplication factor for the reflectance values returned by the get functions. Please refer to the supplier’s website for more information. For example theia S2 data is provided as int16 with a nodata value of -10000.
Warning
The spectral indices generated by iota2 like NDVI, NDWI and Brightness are converted in integer using a factor of 1000.
Then, the function provided by the user must use these functions to get and produce a numpy array. The function must return also a list of label names (or empty for default naming). See examples below for a better understanding.
Recommendations:
A simple way to know which get functions are available, is to create a data container object like in the folowing example.
def print_get_methods(config_file: str, tile: str = "T31TCJ"):
    """
    This function prints the list of methods available to access data
    """
    # At this stage, the tile name does not matter as it only used to
    # create the dictionary. This dictionary is the same for all tiles.
    sensors_parameters = rcf.Iota2Parameters(config_file).get_sensors_parameters(tile)
    enable_gap, enable_raw = rcf.ReadConfigFile(config_file).get_param(
        "python_data_managing", "data_mode_access"
    )
    exogeneous_data = rcf.ReadConfigFile(config_file).get_param(
        "external_features", "exogeneous_data"
    )
    data_cont = CNF.DataContainer(
        sensors_parameters,
        configuration=CustomFeaturesConfiguration(
            enabled_raw=enable_raw,
            enabled_gap=enable_gap,
        ),
        exogeneous_data_file=exogeneous_data,
    )

    # This line show you all get methods available

    functions = [fun for fun in dir(data_cont) if "get_" in fun]
    functions.sort()
    for fun in functions:
        print(fun)
Examples:
A full example for using external features, using Sentinel2.
First, create a python file, named my_module.py containing one function:
from iota2.learning.utils import I2Label

def get_soi(self):
    """
    compute the Soil Composition Index
    """
    coef = (self.get_interpolated_Sentinel2_B11() - self.get_interpolated_Sentinel2_B8()) / (
    self.get_interpolated_Sentinel2_B11() + self.get_interpolated_Sentinel2_B8())
    labels = [I2Label(sensor_name="soi", feat_name=i + 1) for i in range(coef.shape[2])]
    return coef, labels
In this case, the output is a tuple of SOI indices and corresponding labels name. The output type for coef is float, it is also possible to convert it as int by applying a coefficient (1000 for instance) and then converting it using astype built-in numpy array function (see https://numpy.org/doc/stable/reference/generated/numpy.ndarray.astype.html).
Note
returned labels must be a list of I2Label or I2TemporalLabel class. If an empty list, is returned, then a default value will be assigned to each features formatted as custfeat_numXbN where X is the index of the function in the functions parameter which computed the feature and N the feature index.
It is possible to use raw data instead of interpolated data, if the parameters are well set.
A minimal configuration example:
...
external_features:
{
    module:"path/to/module/my_module.py"
    functions: "get_soi"
}
python_data_managing:
{
    chunk_size_mode:"split_number"
    number_of_chunks:50
}
Example for passing keyword arguments to the feature:
# syntax for function without arguments
functions: "function_one function_two"
# syntax with arguments for function_two
functions: ["function_one", ["function_two", {"param_one": "one", "param_two": 2}]]
Using raw and interpolated data together can lead to ram issue. In this case, the main option is to increase the total number of chunks used.
According to the sqlite limitations, the total number of features cannot exceed 1000.