iota2 features tiler
Assuming iota2 is fully operational, this chapter presents an usage of iota2: the production of rasters regarding a user grid in vector or raster format.
Purposes
Iota2 allows the use of precomputed features which allows existing features(as rasters on disk) to be introduced as such into the iota2’s workflow. These data must however meet certain constraints: the footprints and resolutions must be identical to the workflow data.
This functionality has been created to help users to fulfill this constraint. By considering a reference grid (in vector or image format) the processing chain will tile the user data.
Inputs
grid from vector
The reference grid can be a vector database (shapeFile) which must contains a single layer where each entry is an element of the grid. Therefore each element must be unique and contains a single geometry of type POLYGON, no MULTIPOLYGONS, POINTS or LINESTRINGS.
In this case, the user will have to fill in the fields grid and tile_field which are respectively the file to the database and the field that contains the name of tiles. In addition, the parameter spatial_resolution must also be specified to specify output resolution.
The following figure shows an example of a grid that meets the above constraints (it is the MGRS grid available here)
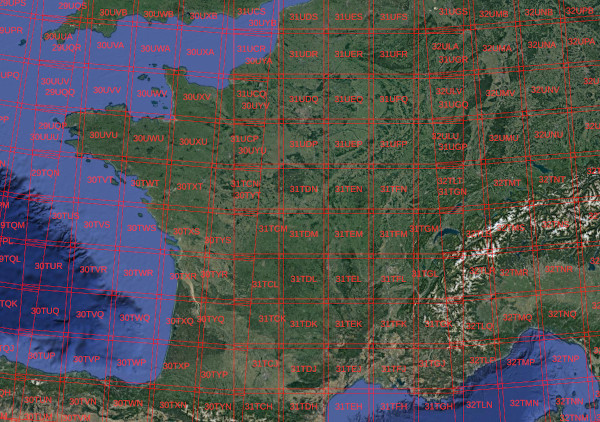
grid as vector database
grid from rasters
Thanks to the parameter rasters_grid_path, the grid can be given as a list of rasters: each raster representing an element of the grid. All these rasters must be placed in one directory, here is an example with 4 tiles stored in a directory ‘raster_grid_directory’.
/path/to/raster_grid_directory
    ├── T31TCJ.tif
    ├── T31TCK.tif
    ├── T31TDJ.tif
    └── T31TDK.tif
Warning
Parameters chain.grid and chain.rasters_grid_path cannot be used simultaneously. Users must choose between these 2 possible uses.
No tiled data
The features to be tiled must all be contained in a single directory. This directory must be specified in the configuration file through the parameter features_path.
Warning
Concerning non-tiled data output resolution, when the grid is provided as a raster list, it will be identical to the reference tile.
Running the chain
Tutorial configuration file
First we have to fill a configuration file, to set up iota2.
chain :
{
  output_path : '/XXX/iota2_tiler_outputs'

  first_step : 'tiler'
  last_step : 'tiler'

  proj : 'EPSG:2154'
  rasters_grid_path : '/XXX/grid_raster'
  list_tile : 'T31TDK'
  features_path : '/XXX/non_tiled_features'

  spatial_resolution : 10 # mandatory but not used in this case. The output spatial resolution will be the one found in 'rasters_grid_path' directory.
}

builders:
{
builders_class_name : ["I2FeaturesToGrid"]
}
Once the configuration file is filled, it’s time to run iota2.
Launch iota2
Iota2.py -config /path/to/my_configuration.cfg -scheduler_type localCluster
Did it all go well?
Iota2 is packed with a logging system. Each step has its has its own log folder, available in the output_path/logs directory (see logs in Output tree structure)
In these directories two kind of log can be found *_out.log and *_err.log.
The error are compiled in “err” file and the standard output in “out” file.
With the scheduler dask, iota2 go as far as possible while the data required for the next steps is available.
To simplify the error identification, an interactive graph is produced in a html page.
To open it, open the index.html file in html folder.
Nodes in graph can have three colors (red: error, blue: done, orange: not yielded).
By clicking on graph node, the corresponding log file is openned.
If despite all this information, the errors can not be identifiyed or solved, the iota2 can help all users. The simplest way to ask help is to create an issue on framagit by adding the archive available in log directory.
Output tree structure
Here is the expected iota2 outputs once run with the tutorial dataset.
- /XXX/iota2_tiler_outputs
- output folder
output folder defined in config file output_path
- ! logs
- logs
A directory which contains a directory for each steps.
- ! FeaturesTiler
tile_T31TCJ_myfeature.err
tile_T31TCJ_myfeature.out
tile_T31TCK_myfeature.err
tile_T31TCK_myfeature.out
tile_T31TDJ_myfeature.err
tile_T31TDJ_myfeature.out
- logs.zip
- logs archive.
- This archive can be attached to ask for help
- html
logs as html
- IOTA2_tasks_status.txt
- internal execution status
- Iota2 keeps track of it’s execution using this pickle file (not text) to be allowed to restart from the state where it stopped.
- ! T31TCJ
- Tile directory
- there is one directory for every tiles in list_tile parameter
myfeature.tif
- ! T31TCK
myfeature.tif
- ! T31TDJ
myfeature.tif
Note
Final products will be stored in output_path/tile_name directory.
Extra outputs
WorldClim data
It is possible to ask iota2 to tile worldclim data. Iota2 will attempt to tile this data when the worldclim_path parameter is populated with the path to the directory containing the entire worldclim data.
Iota2 will then produce a stack of all worldclim data per tile under the name worldclim.tif.
Warning
Currently, it is not possible to process only one part of the worldclim data. The entire dataset must be downloaded and available in the directory.
DEM
Iota2 is also able to produce DEM per tile from the 30m SRTM data. This data must be in .hgt format, stored in a single directory given to iota2 by the parameter srtm_path. Then iota2 will produce 3 rasters : slope.tif, aspect.tif and elevation.tif.
Sentinel-2 angles
Once the parameter s2_path is set, iota2 will calculate the solar zenith and azimuth angles. It will also produce the odd and even incidence angles. These angles will first be written for each Sentinel-2 acquisition, then stored as a chronologically ordered stack for each tiles under the names SOLAR_ZENITH.tif and SOLAR_AZIMUTH.tif for the solar angles and EVEN_ZENITH.tif, ODD_ZENITH.tif, EVEN_AZIMUTH and ODD_AZIMUTH.tif for the local incidence angles.
Sentinel-1 angles
The parameter s1_dir enables angle generation for Sentinel-1 acquisitions. This directory must contain all Sentinel-1 acquisitions (*.SAFE files). For each Sentinel-1 acquisition, the local incidence angles are computed on all tiles as well as the satellite azimuth. The incidence angles are computed by learning a linear regression model from the GCPs and then making the prediction on the whole tile.
iota2 will then produce 2 stacks for the azimuth of the satellite: one stack for the ascending orbits and the other for the descending orbits (s1_azimuth_descending.tif and s1_azimuth_ascending.tif). In a similar way, 2 stacks will be produced for the local incidence angles: s1_incidence_descending.tif and s1_incidence_ascending.tif.
All these stacks are ordered chronologically, 1st date = 1st band.
Note
If two Sentinel-1 products acquired on the same day intersect the same tile, then iota2 will merge the output of the angles from each acquisition into a single image.
Toy dataset
A toy dataset is available here (52Mo) . It contains data to be tiled and 3 reference rasters. The following tree describe the content of the archive.
- archive_content
- content of
tiler_tutorial.tar.gz 50 Mo
- ! config
- configuration file to parameterize iota2.
configuration file to parameterize iota2.
iota2_as_tiler.cfg
- ! grid_raster
- directory containing rasters to fit
the raster name and tile’s name must be the same
T31TCJ.tif
T31TCK.tif
T31TDJ.tif
- ! non_tiled_features
- directory containing rasters to tile.
the rasters can have multiple bands.
myfeature.tif
- content of
Full configuration file
all available parameters for this worflow are listed in the configuration file below :
chain :
{
  output_path : '/XXX/iota2_tiler_outputs'

  spatial_resolution : 10
  first_step : 'tiler'
  last_step : 'tiler'
  list_tile : 'T31TCJ'
  proj : 'EPSG:2154'

  grid : '/path/to/my_grid.shp'
  tile_field : 'Name'
  rasters_grid_path : '/path/to/a_directory_of_tiled_rasters'

  srtm_path:'/path/to/SRTM_30'
  worldclim_path:'/path/to/worldclim'
  features_path : '/path/to/a_directory_of_non_tiled_features'
  s2_path : '/path/to/sentinel2_by_tiles_acquisitions'
  s1_dir:'/path/to/sentinel1_acquisitions'

  output_features_pix_type : 'float'
  from_vectordb_resampling_method :'near'
  from_rasterdb_resampling_method :'nn'
  spatial_resolution : 10
}

builders:
{
builders_class_name : ["I2FeaturesToGrid"]
}
A list of all parameters with descriptions is available here