I2Classification advanced uses
Preparing your data
Images
Reference data
The reference data file must respect the following rules
If must be a shapefile (.shp)
The file must contain an integer field or a string field corresponding the class membership.
Geometries have to be a POLYGON type
No overlap between polygons
File’s name must not contains special characters at first position (not an ascii_letters )
Note about labels as strings
If the field which discriminates classes is in a string format then the output classification will be an image containing integers from 1 to N where N is the number of classes. A correspondence table, called *_table.csv, is provided next to final classification helping user to find which integer correspond to which original class. Also, color indexed classifications will be produce with integers pixels type. The csv table includes also color information. For instance if the input database contains 3 labels urban, wheat, and forest then the csv will be :
#USER LABEL,IOTA2_LABEL,RED_VALUE,GREEN_VALUE,BLUE_VALUE
urban, 1, 0, 255, 255
wheat, 2, 255, 0, 255
forest, 3, 0, 0, 255
1, 2 and 3 are the labels generated by iota2 and RGB values are set up according to color_table parameter. color_table
Nomenclature
The nomenclature file is mandatory and describes the input classes. This file is only read during report generation to re-label the classes, it is useful if classes are designed by integer values. If the input database contains 3 integer classes: 1, 2 and 3 then the nomenclature file can be:
first class label:1
second class label:2
third class label:3
Color table
The color table file is mandatory and attributes RGB colors to every class and enables iota2 to produce a color indexed classification raster. If the input database contains 3 integer classes: 1, 2 and 3 and the pixels 1 must be in red, 2 in green and 3 in blue then the color file must be:
1 255 0 0
2 0 255 0
3 0 0 255
Region shapefile
This shapeFile is optional an represents model’s stratification / spatial repartition. If a user wants to use this spatial stratification in the classifications, several rules have to be respected:
The input database must be a shapeFile
The column discriminating regions has to be in string format but must be castable to an integer.
No overlapping between polygons
The file name must not contains special characters at first position
Expand your map
iota2 allows the use of many tiles to produce classifications. If you want to use more than one tile, you have to create a directory for each tile (and download the data) in the sensor_data directory.
One is already created in sensor_data : T31TDJ which is empty.
As before, you can download dates and unzip them in the corresponding directory.
Warning
Do not forget to add the tile in the field list_tile of the configuration file.
list_tile:'T31TCJ T31UDP'
Multi regions
You can give to iota2 a shapeFile describing different regions (spatial stratification). Each polygon contains
a label referencing the region it belongs to. In the archive there is the file EcoRegion.shp containing two regions.
What is it used for ?
If the area to be classified is large, a given class may have different behaviours due to different climate conditions. Train a different classifier for each eco-climatic area can improve the quality of the maps. To classify the entire French metropolitan area, we used the following region distribution (more details about the national product).
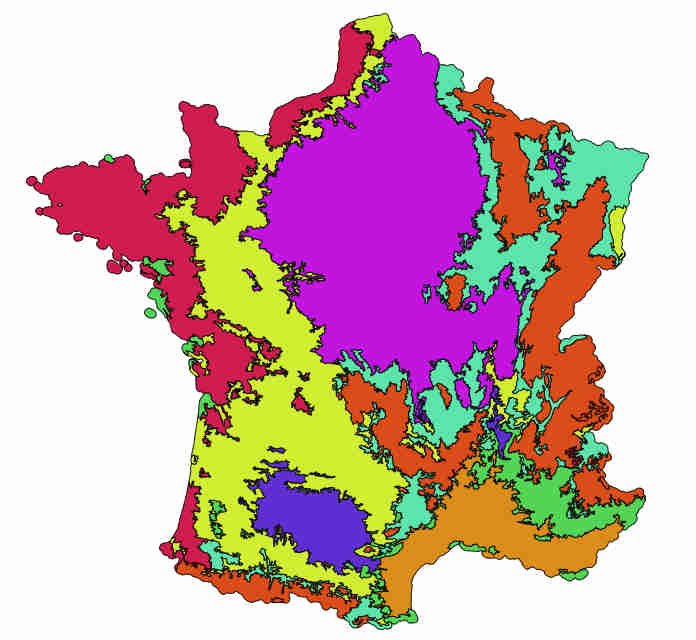
France regions
How to set it in the configuration file ?
As already explained, the region shapefile must contain a field to descriminate regions.
Let’s have a look at the shape EcoRegion.shp
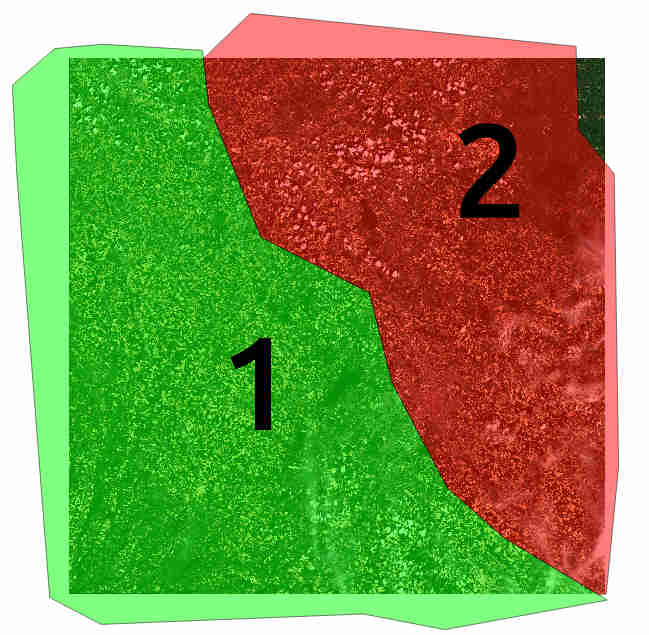
Region shape Example
There are two regions, region “1” and “2” (field region) which cover almost a full Sentinel-2 tile.
Two models will be produced: the first one will use training polygons of groundTruth.shp under the green region, while
the second model will use polygons under the red region.
Note
Each model will classify only its own region.
Warning
There must not be overlapping between polygons in the regions shapefile.
In order to use the region file add these fields to your configuration file :
chain:
{
...
region_path:'/XXXX/IOTA2_TEST_S2/EcoRegion.shp'
region_field:'region'
...
}
Here is the example of configuration file configuration
iota2’s outputs with regions
Every iota2 run follows the same workflow but can generate different outputs.
In this particular run, iota2 generated two models (in the model directory).
Each model is used to classify its region as show below:
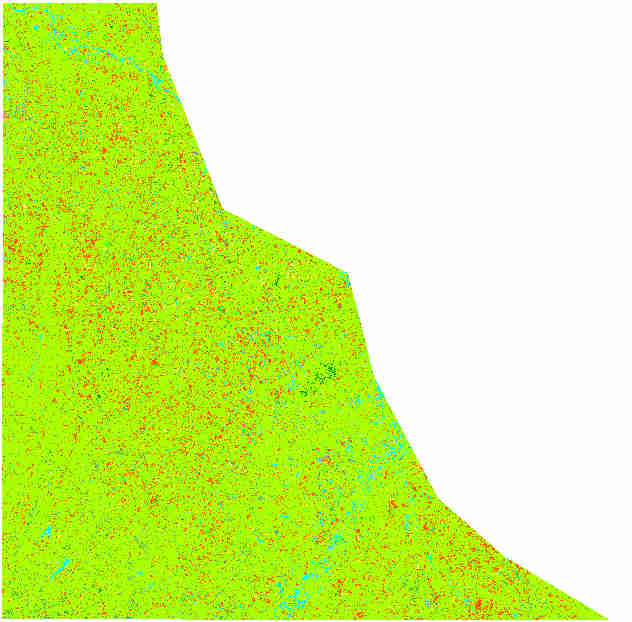
classification of region 1 |
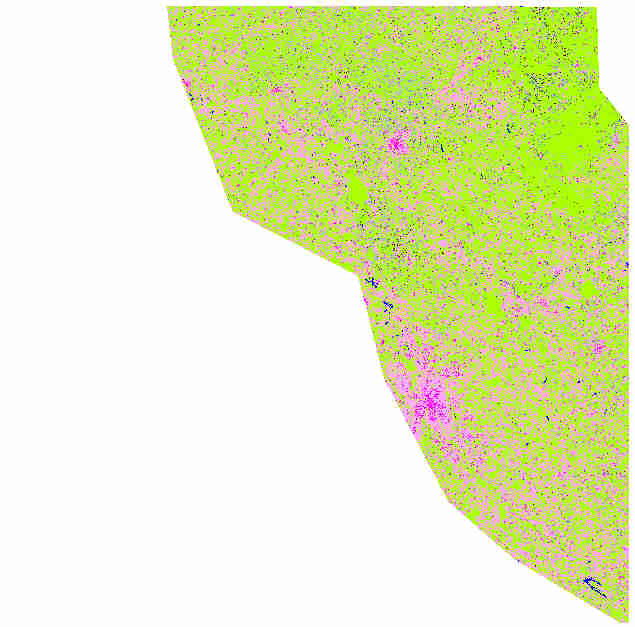
classification of region 2 |
Then these two rasters are merged and constitute the final classification.
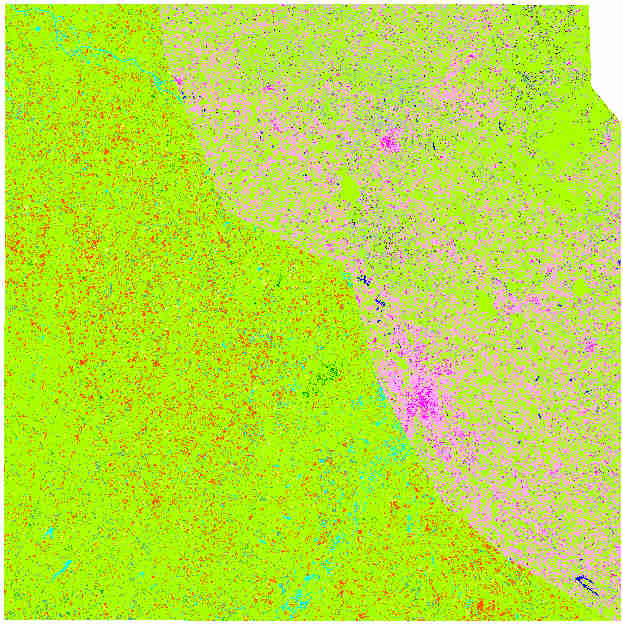
Classif_Seed_0.tif Multi regions Example
Note
you can notice that the right-top corner is not classified. It’s because this area does not belong to any region.
Fusion of classification at regions boundary
Use the spectral features
iota2 computes the features required to produce the land cover map. It can be useful to access this data for other works or analyse time series profiles. For more explanation to access this data refer to:
Multi sensors time series
Understand the sampling strategies
iota2 use OTB polygons sampling strategies. If the reader is not familiar to them, more information are available:
Understand the sample augmentation
iota2 can use the data augmentation OTB feature to artificially increase the number of samples available. For more information refer to:
Understand probability map
iota2 is able to generate a probability map containg confidence for each class. For more information refer to :
use scikit-learn
iota2 is able to use some scikit-learn classifier
use deepLearning
iota2 is able to use some deepLearning workflow
Dimensionality Reduction
If your want to reduce your features data, you can use some dimensionality reduction algorithm through external features workflow.
Yearly crop class learning
Certain uses of iota2 (classification of agricultural data) make it possible to mix ground truths from different years.